
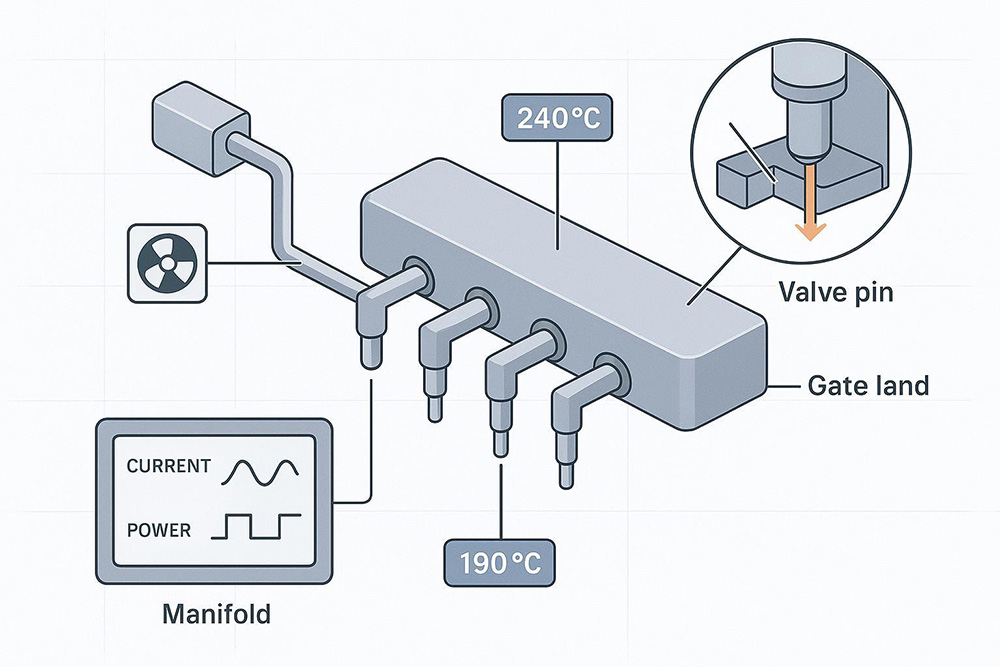
Hot runner systems are widely used in modern injection molding because they improve production efficiency, reduce material waste, and support high-volume manufacturing. They are especially important in multi-cavity molds where consistent melt flow and temperature stability are critical.
However, even well-designed hot runner systems can experience processing defects. Two of the most common problems are hot runner stringing and short shots in injection molding.
These defects can cause several production challenges, including:
-
Increased scrap rates
-
Poor product surface quality
-
Inconsistent cavity filling
-
Production instability
-
Higher manufacturing costs
Understanding the root causes of these problems and applying effective hot runner troubleshooting methods can significantly improve molding stability and product quality.
This guide explains the main causes of hot runner stringing and short shots, along with practical solutions that engineers can apply directly on the shop floor.
Quick Answer
Hot runner stringing occurs when molten plastic forms thin threads at the gate during mold opening.
This happens when the polymer remains molten after the valve gate closes and stretches as the mold separates.
The most common solutions include:
-
Lowering nozzle temperature by 5–10°C
-
Adjusting valve gate timing
-
Inspecting valve pin and gate seat wear
-
Stabilizing hot runner temperature control
-
Optimizing mold temperature and injection settings
Implementing these adjustments usually eliminates stringing and improves overall process stability.
What Is Hot Runner Stringing in Injection Molding?
Hot runner stringing is an injection molding defect where molten plastic forms thin “strings” or tails at the gate after the mold opens.
Instead of separating cleanly, the plastic stretches between the nozzle and the molded part. This phenomenon is sometimes referred to as hot runner drooling.
Hot runner stringing is particularly common when processing materials such as:
-
Polypropylene (PP)
-
Polyethylene (PE)
-
Low-viscosity thermoplastics
These materials remain fluid for longer periods, which increases the likelihood of melt stretching if temperature control or valve gate timing is not optimized.
Typical Signs of Hot Runner Stringing
Common indicators include:
-
Thin plastic threads at the gate
-
Melt drooling between injection cycles
-
Cosmetic defects on visible surfaces
-
Extra trimming is required after molding
If left unresolved, hot runner stringing can reduce product quality and increase cycle time.
How to Fix Hot Runner Stringing
Engineers can eliminate hot runner stringing by following a systematic troubleshooting process.
Step 1 – Reduce Nozzle Temperature
Excessive nozzle temperature keeps the melt fluid after the gate closes.
Lower the nozzle temperature by 5–10°C and observe the gate condition.
Step 2 – Adjust Valve Gate Timing
If the valve pin closes too late, molten plastic may continue flowing.
Advance the valve gate closing timing by 50–150 milliseconds.
Step 3 – Inspect Valve Pin and Gate Seat
Mechanical wear can prevent the gate from sealing completely.
Check:
-
Valve pin stroke
-
Gate seat condition
-
Pin alignment
Step 4 – Stabilize Hot Runner Temperature Control
Temperature fluctuations can cause inconsistent melt behavior.
Inspect:
-
Thermocouple installation
-
Heater wiring
-
Controller accuracy
Step 5 – Optimize Mold Temperature
Mold temperature influences gate sealing and melt viscosity.
Adjusting mold temperature can help achieve a clean gate break.
Top Causes of Hot Runner Stringing
The most common causes of hot runner stringing include:
-
Excessive nozzle tip temperature
-
Incorrect valve gate closing timing
-
Worn valve pin or gate seat
-
Inaccurate thermocouple readings
Identifying the exact cause allows engineers to apply targeted adjustments rather than random parameter changes.
Main Causes of Hot Runner Stringing
Below are the most important technical factors that contribute to stringing.
Excessive Nozzle Tip Temperature
High nozzle temperature is one of the most common reasons for stringing.
If the temperature is too high, the melt remains fluid after the valve gate closes.
Solution
Lower nozzle temperature slightly while maintaining proper thermal balance.
Recommended temperature difference:
|
Component |
Recommended ΔT |
|
Manifold to Nozzle |
10–15°C |
Maintaining a controlled temperature gradient helps prevent melt stretching.
Incorrect Valve Gate Timing
Valve gate timing determines when the melt flow stops.
If the valve pin closes too late, molten plastic may leak through the gate and form strings.
Solution
Adjust valve timing earlier by 50–150 ms.
This ensures the gate seals before the mold opens.
Worn Valve Pin or Gate Seat
Mechanical wear in valve gate systems can cause leakage.
Over time, the valve pin or gate seat may degrade due to repeated operation.
Inspection Checklist
Check the following components:
-
Valve pin stroke
-
Gate seat wear
-
Alignment accuracy
-
Actuation pressure
Replacing worn components often resolves the issue.
Unstable Temperature Control
Inaccurate temperature readings can lead to thermal instability.
Signs of this problem include:
-
Temperature fluctuations greater than ±5°C
-
Erratic heater power output
-
Inconsistent cavity filling
Solution
Verify the installation of thermocouples and ensure correct polarity.
A faulty sensor can send incorrect signals to the temperature controller.
What Causes Short Shots in Injection Molding?
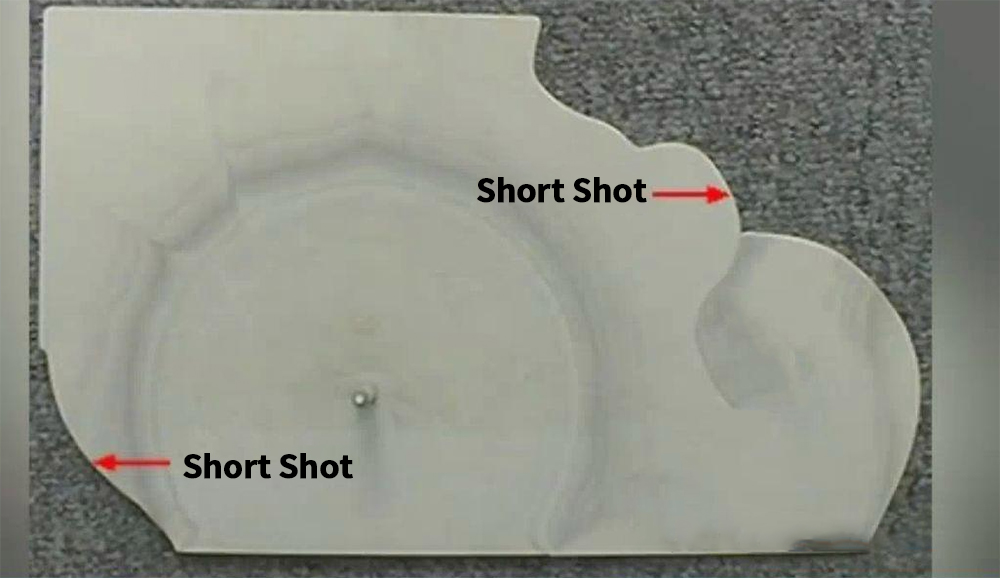
A short shot occurs when molten plastic does not completely fill the mold cavity.
Instead of forming a full part, the melt stops flowing before reaching the end of the cavity.
Typical short shot defects include:
-
Missing material at the flow end
-
Incomplete thin walls
-
Uneven filling across cavities
Short shots usually indicate insufficient melt flow energy or premature solidification.
Main Causes of Short Shots
Several process factors can cause short shots in injection molding.
Low Melt Temperature
Low melt temperature increases polymer viscosity and restricts flow.
Recommended Melt Temperature
|
Material |
Melt Temperature |
|
Polypropylene (PP) |
200–250°C |
|
Polyethylene (PE) |
180–220°C |
|
ABS |
220–260°C |
|
Nylon (PA) |
240–290°C |
Increasing melt temperature slightly can improve filling performance.
Insufficient Injection Speed or Pressure
Low injection speed reduces melt momentum, making it difficult to fill distant cavity areas.
Solution
Increase:
-
Injection speed
-
First-stage injection pressure
This helps the melt reach the end of the flow path before freeze-off occurs.
Hot Runner Temperature Imbalance
In multi-cavity molds, uneven temperatures between hot runner zones can cause inconsistent filling.
Signs include:
-
One cavity producing short shots
-
High heater power in a single zone
Inspect heaters, insulation, and thermocouple placement.
Poor Mold Venting
Air trapped in the cavity can block melt flow.
Symptoms include:
-
Burn marks
-
Flow hesitation
-
Incomplete filling
Cleaning or improving mold vents can significantly improve filling performance.
Hot Runner Troubleshooting Checklist
Engineers can follow this checklist to quickly diagnose hot runner problems.
Step 1 – Verify Resin Material
Confirm the correct resin grade and ensure there is no contamination.
Step 2 – Inspect the Temperature Controller
Check:
-
Heater power signals
-
Thermocouple readings
-
Temperature stability
Step 3 – Adjust Thermal Balance
Maintain proper temperature difference between manifold and nozzle.
Typical ΔT range:
10–15°C
Step 4 – Optimize Valve Gate Timing
Adjust valve timing in increments of 20–50 ms.
Step 5 – Set Proper Backpressure
Backpressure helps homogenize the melt.
Typical values for PP and PE:
3.5–7 bar (50–100 psi)
Step 6 – Improve Mold Venting
Ensure vents are clean and properly sized.
Why Stable Hot Runner Temperature Control Is Critical
Precise temperature control is essential for hot runner performance.
Modern temperature controllers provide:
-
Multi-zone temperature management
-
Real-time heater power monitoring
-
Thermocouple diagnostics
-
High-precision temperature stability
These capabilities allow engineers to quickly identify heater failures, sensor errors, or temperature imbalance.
Stable temperature control ensures consistent melt flow across all cavities, which helps prevent both hot runner stringing and short shots in injection molding.
Conclusion
Hot runner stringing and short shots are common injection molding defects, but they can usually be resolved through systematic troubleshooting.
Key optimization strategies include:
-
Maintaining balanced hot runner temperatures
-
Adjusting valve gate timing
-
Ensuring accurate thermocouple measurements
-
Optimizing injection pressure and speed
-
Improving mold venting and temperature management
With proper process control and reliable temperature management, manufacturers can significantly improve product quality and production efficiency.
FAQ About Hot Runner Stringing
What is hot runner stringing in injection molding?
Hot runner stringing is a defect where molten plastic forms thin threads at the gate after the mold opens. It usually occurs due to excessive nozzle temperature or incorrect valve gate timing.
How do you fix hot runner stringing?
Hot runner stringing can be fixed by lowering nozzle temperature, adjusting valve gate timing, inspecting valve pin wear, and stabilizing hot runner temperature control.
What causes short shots in injection molding?
Short shots typically occur due to low melt temperature, insufficient injection pressure, poor mold venting, or temperature imbalance in the hot runner system.
What temperature should a hot runner be?
Hot runner temperatures depend on the material being processed. For example:
PP: 200–250°C
PE: 180–220°C
Manufacturers should follow the recommended processing temperature for each resin.